Mic-Key Button Insertion Procedure
What do I need to know before I place a MIC-Key button?
If your child still has their very first tube, and it was never changed before, then do not change the button. Your doctor or nurse will tell you when the first tube change will happen.If your child’s tube has been changed and you were shown how to change it, then you can change it yourself. Change the button every 3 to 6 months. Sometimes the button needs to be changed sooner if it fails.
You can use the manual that came in the button kit. If you were never shown how to change a button, talk with your child’s nurse or doctor.
Helpful tips
- Keep a spare button kit and bottled water in a Ziploc® bag. Take this with you wherever you go with your child. You never know when the tube may fall out. If your child’s button falls out, try to get it back in as soon as you are able.
Put in a Ziploc® bag:
– Spare MIC-Key button kit
– Water soluble lubricants like K-Y jelly™ or Surgilube®
– Sterile, distilled or bottled water
– Gauze
- When changing the button, have all your supplies set up and ready to go. This makes it easier and quicker when replacing the tube.
- Change the tube on an empty stomach so food does not leak out.
- Your child may have a little bleeding or soreness after a tube change. It is helpful to use distraction while changing the tube.
- After you use the spare tube at home, call your supply company (DME) so they can send another spare tube to your home.
- If the tube breaks within 3 months of being placed, save the tube and call Avanos/MIC-Key Company at 1-844-428-2667. Choose option 1. Then choose option 3. They have a 3-month guarantee.
How do I replace the button?
1. Get supplies ready.
- Button kit the same size as your child’s button. Check the box that it is the right size before using.
- Water soluble lubricants like K-Y jelly™ or Surgilube®
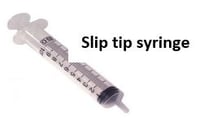
- Slip tip syringes. It is best to have two of these.
- Sterile, distilled or bottled water for the balloon. Do not use tap water or saline.
2. Wash your hands with soap and water.
3. Open the kit and get the new button ready.
- If the button kit has a stylet, put it into the opening at the top of the button. It helps stiffen the stem for placement.
- Put lubricant on the tip of the stem of button. This is the part with the balloon.
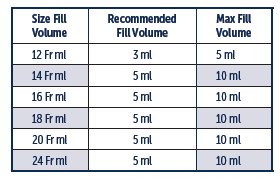
- Pull new water up into a slip tip syringe. Sometimes using more or less water is needed. See chart for amount that will work in the balloon.
4. Remove the button from your child.
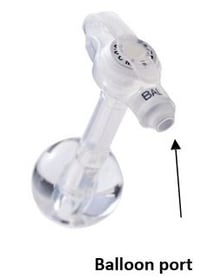
- Put the slip tip syringe into the balloon port.
- Remove all the water from the balloon.
- Gently pull up on the button until it is out of the opening. You may put gauze over the opening if stomach juices or feedings are oozing out.
5. Place the new button.
- Gently push the lubricated button into the opening of your child. Do not force the button. Stop and call your child’s nurse or doctor if you cannot get the button in. A little pressure is ok.
- Hold the button in place and remove the stylet.
- Put the slip tip syringe with water into the balloon port.
- Push the plunger on slip tip syringe until all the water is out of the slip tip syringe.
- Take out the slip tip syringe from the balloon port.
6. Gently pull up on the button.
7. Wipe away the extra lubricant from the skin.
8. Turn or spin button in the tract.
9. Check that the button is in the right place.
- Attach the extension set.
- Pull back on the plunger until you see gastric juices or formula. This tells you that the button is in the stomach.

What problems may I have when replacing the button?
Problem: Button fell out
Causes:
- Balloon broke or had water removed.
- Button got pulled at or caught on something.
Solution:
- Check the balloon to see if it is broken. If it is not broken, it is ok to put the same button back in. If it is broken, replace the button using the spare one.
- Always try to replace the button as soon as you can, even if you do not know when the button fell out. The opening starts to shrink after one hour.
Problem: The button will not go back in
Causes: Opening in skin may have started to shrink.
Solution:
- Never force the button in. Try using more lubricant at site.
- If you are not able to get the button in because of too much resistance, stop and call your child’s doctor or nurse.
Problem: Balloon will not deflate
Causes: Balloon port clogged.
Solution: Gently twist the slip tip syringe in the balloon port until the valve is opened. Using a moist cotton-tipped applicator, clean out the balloon port. Attach a syringe and try again. Call the clinic to talk to the nurse or doctor if this does not work. If this is your child’s first tube, you should not check water balloon.
Problem: The button needs changing and no spare button at home
Causes:
- Used the max amount of buttons allowed per year.
- Forgot to call Supply Company to get another button.
Solution:
- If the button needs to be replaced because the balloon is broken, put the broken button back in the opening and tape in place. Then call your child’s nurse or doctor.
- If you never got a spare button sent to your home, call the Supply Company.


