Orthodontic Spacer
A spacer is a small rubber band that goes in between teeth. It is also called a separator. It helps to create space in between teeth. Learn more about how spacers are placed and how to care for them.
What is a spacer and why is it used?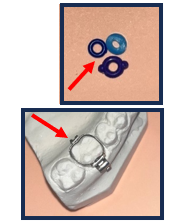
A spacer is a small rubber band that goes in between teeth. It is also called a separator. It helps to create space in between teeth. This space will allow the Orthodontic team to fit a band around a tooth for braces.
What do I need to know after a spacer is placed?
Oral care
Your child can brush normally with spacers in. Flossing can be done, except between teeth where the spacers are located. Flossing in those spaces can pop the spacer out. Or the floss can push the spacer deeper into the gum tissue.
Discomfort or soreness
The spacer may feel different at first. It may feel like food is stuck between the teeth. This may last for a few days. The area may become sore as the spacer helps move the teeth apart. To help with any soreness or discomfort your child can:
- take over the counter pain medicine.
- eat soft, cold foods or drink cold liquids.
Eating with spacers
Do not eat sticky foods like gum, caramel, sticky or chewy candy. These sticky foods can pull the spacers out.
Care for spacers
Do not play with or pick at the spacers. This may cause them to fall out. If they do fall out, follow the “how do I place a spacer” steps below.
Take note of where your spacers are placed. Take a cell phone picture to help you remember. Know how many spacers you have when you leave your visit. This will help you identify if and where a spacer has fallen out.
What if a spacer falls out?
You have been given extra spacers and the “how do I place a spacer” steps below. Replace a lost spacer in 24 hours or the space will start to close, and it might be harder to get the spacer back in.
How do I place a spacer?
1. Gather the supplies: 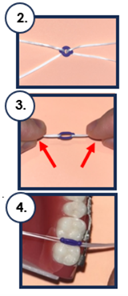
- Spacers. They may be different colors based on what size is needed.
- Two pieces of dental floss. Each floss should be 12 inches long.
2. Thread the 2 pieces of dental floss through the spacer. Spread each piece of floss out at each end so they are not touching each other.
3. Pull opposite ends of each piece of floss to stretch out the spacer.
4. Slide 1 side of the spacer between the teeth, like flossing. It should sit just above the top of the tooth.
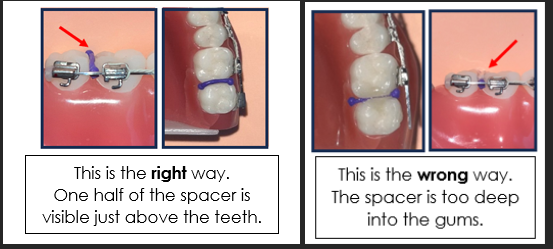
5. One half of the spacer should be visible just above the teeth. The other half of the spacer should be between the teeth. The spacer should not be going deep into the gums. If the spacer is placed in the wrong way, pull it out and try again.
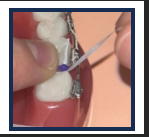
6. Remove the 2 pieces of floss. Put 1 finger over the spacer. Pull out 1 piece of floss from the spacer and out of the mouth. Then, do the same with the other piece of floss.
If a spacer will not stay in after you replace it, check to see if there is enough space between the teeth
Take a piece of floss 12 inches long. Place the floss between the teeth where the spacer was located.
- If you can feel the floss touch the teeth before the gum tissue, then there is not enough space. The spacer needs to be put back in. Follow the “how do I place a spacer” steps above.
- If you can feel the floss touch the gum tissue without touching the teeth, then there is enough space. The spacer does not need to be put back in. However, please check the space each day until your next visit.
If you are not able to place a spacer or have questions, call the Children’s Wisconsin Dental clinic at 414-266-2040 during clinic hours of 8am to 430pm. A provider at our clinic will help you get the spacers back in at home or have you come to clinic to replace them.
Draft Number: 2219