How To Change a MIC-Key Button
When Can You Change Your Child’s MIC-key Button?
If your child’s MIC-key button has been changed before and you were taught how to do it, then you can change it at home. It should be changed every 3 to 6 months, or sooner if needed.
You may need to change it early if:
- The button is broken.
- You see leaking around the button.
- The balloon will not hold water.
- The button falls out.
If your child still has their very first MIC-key button and it has never been changed before, do not change it yourself. Your child’s nurse or provider will tell you when the first MIC-key button change should happen.
Helpful Tips:
- Keep an extra button kit and bottled water in a Ziploc® bag. Take it with you wherever you go. You never know when your child’s button may fall out. If the button does fall out, try to put a new one in as soon as you can.
- When you change the button, have all your supplies ready. This makes the change quicker and easier.
- Change the tube when your child has an empty stomach, so food does not leak out.
- There may be a little bleeding or soreness after the change.
- Use distraction during the button change to help keep your child calm.
- After you use your extra button, call your supply company (DME) so they can send you a new one.
- If the button breaks within 3 months of being placed, save it and call Avanos/MICKey at 1-844-428-2667 (option 1, then option 3). They offer a 3-month guarantee.
Steps To Change The MIC-key Button:
- Collect your supplies:
- Button kit: Make sure it is the same size as the one your child already has. The FR (French) size and the cm (centimeter) length should match.
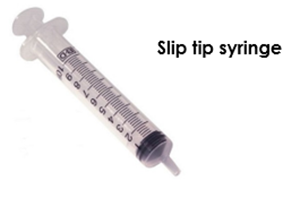
- Slip tip syringes: It is best to have 2 syringes. The kit only comes with one.
- Sterile, distilled, or bottled water: Use this to fill the balloon. Do not use tap water or saline.
- Wash your hands with soap and water.
- Get a new button ready.
- Open the kit and get the new button ready.
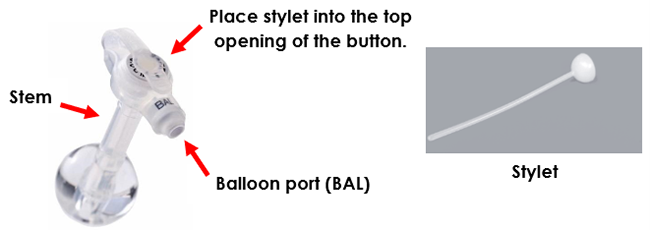
- If your kit has a stylet, place it into the top opening of the button. This makes the stem (the part with the balloon) firmer and easier to place in your child’s belly.
- Put a little lubricant on the tip of the stem.
- Pull clean water (sterile, distilled, or bottled) into the slip tip syringe.
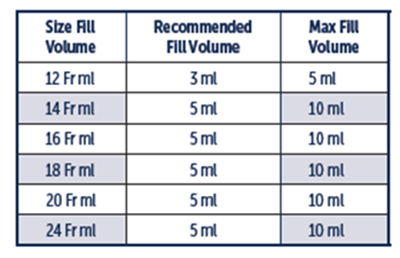
- The amount of water needed can vary. Use the amount your child’s provider recommends or follow the chart below.
- Remove the button from your child.
- Put a slip tip syringe into the balloon port.
- Pull out all the water from the balloon.
- Gently pull the button up until it comes out of the belly.
- You can place gauze over the opening in the belly if stomach juices or formula leak out.
- Place the new button.
- Gently push the lubricated button into the opening on your child’s belly.
Do not force it. A little pressure is okay.
Wiggling or gently twisting the button can help.
If your child is tightening their belly or crying, have them take a deep breath. For babies, wait for a pause or a breath between cries.
Stop and call your child’s nurse or provider if you cannot get the button in.
- Hold the button in place and remove the stylet (if used).
- Put the slip tip syringe with new water into the balloon port.
- Push the plunger until all the water goes into the balloon.
- Keep your thumb on the plunger while you remove the syringe from the balloon port.
- Remove the slip-tip syringe.
- Gently push the lubricated button into the opening on your child’s belly.
- Gently pull up on the button.
- Wipe away the extra lubricant from the skin.
- Turn or spin the button in the tract.
- Check that the button is in the right place.
- Attach the extension set to the button
- Gently pull back on the syringe plunger until you see stomach juices or formula. This shows the button is in the stomach and in the correct place.
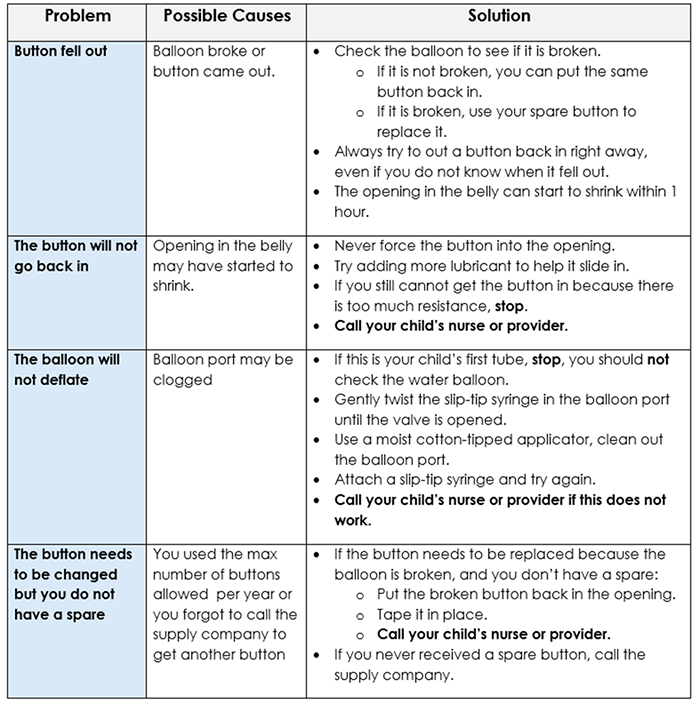
What Problems May You Have When Changing the Button?
To Learn More:
- Review the Care Notebook: Caring for a Child with a Feeding Tube.
- Watch the Children’s Wisconsin video on how to change a MIC-key button.
- Refer to the manual in the button kit.
- Review this Children’s Wisconsin resource about MIC-Key buttons.
Draft Number: 3000